


React Native Testing Best Practices provide a roadmap to flawlessly navigate through the complexities of mobile app development.
Testing plays a crucial role in the development of any software, including mobile apps. When it comes to building mobile apps with React Native, testing is essential to ensure that the app is working the way it should and is free of bugs. React Native testing practices allow developers to catch potential issues early, which can save time and money in the long run.
Why testing is crucial in React Native app development
Testing is an essential aspect of React Native app development, allowing developers to identify issues before rolling out updates to users. React Native app testing not only helps in achieving higher app quality and reducing bugs but also saves time and resources in the long run.
Failing to follow best practices in React Native testing can lead to unstable apps and poor user experience, which can negatively impact your business reputation.
By conducting thorough testing, you can ensure that your React Native app functions as intended, meets user expectations, and provides a seamless user experience. Effective testing methods and best practices can help you detect and fix issues early on in the development cycle, which can save your team time and resources in the long run.

Setting up a testing environment in React Native
Before you can start testing your React Native app, you need to set up a testing environment. This involves installing the necessary testing tools and libraries and configuring your environment for effective testing.
One of the most popular testing libraries for React Native is Jest, which comes preconfigured in most React Native projects. Jest provides a simple and effective testing framework for unit tests, snapshot tests, and integration tests. It also has powerful support for test coverage analysis and makes it easy to generate test reports.
In addition to Jest, you may want to consider using Enzyme, a React-specific testing utility that makes it easy to test components in isolation. Enzyme provides a rich set of APIs for component testing, including shallow rendering and full DOM rendering, as well as methods for finding and manipulating elements.
It’s also important to configure your testing environment to use the correct versions of React and React Native. This ensures that your tests are running against the same versions as your app’s production environment. You can use tools like react-native-testing-library to help with this, as well as to simplify the process of writing integration tests.
Finally, consider using a continuous integration (CI) tool to automate your testing process. This can help you catch issues early and ensure that your app is always in a working state. Popular CI tools for React Native include CircleCI and Travis CI.
Example:
To set up Jest in your React Native project, run the following command:

npm install jest --save-dev

Then, create a file called sum.test.js and add the following code:

function sum(a, b) {
  return a + b;
}

test('adds 1 + 2 to equal 3', () => {
  expect(sum(1, 2)).toBe(3);
});
This code defines a simple function and tests it using the Jest test function. When you run this test using Jest, it should pass, indicating that your environment is configured correctly and you can start writing more tests.
Unit testing in React Native
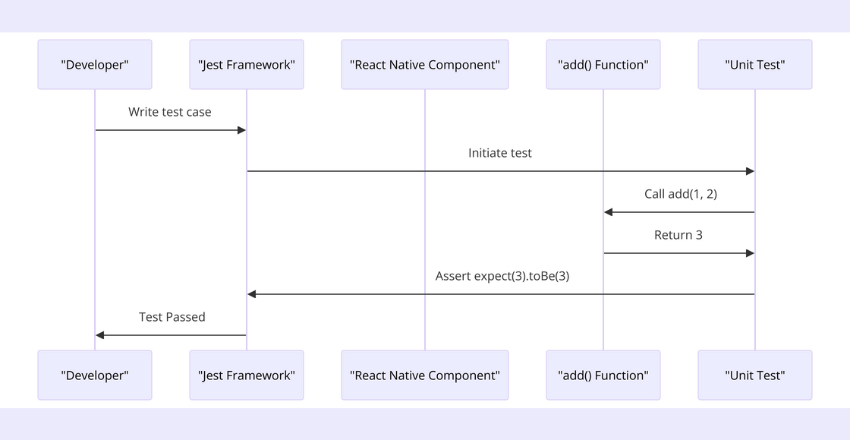
Unit testing is an essential part of React Native testing practices. It involves testing individual components and functions in isolation to ensure they are working as intended. By breaking down the app into smaller parts and testing each one independently, you can catch errors early on and reduce the time and effort required for debugging.
To write effective unit tests, you need to have a good understanding of the component or function being tested and its expected behavior. You can then create test cases that cover different scenarios and edge cases. Popular testing frameworks for React Native include Jest, Mocha, and Jasmine.
Let’s take a look at a simple example:
//function to be tested

function add(a, b) {
  return a + b;
  }

//unit test

test('adds 1 + 2 to equal 3', () => {
  expect(add(1, 2)).toBe(3);
  });
In the above example, we are testing a simple function that adds two numbers. The test case checks if the function returns the expected output for the given input values. The expect function compares the actual output with the expected output. If they match, the test case passes. If not, the test case fails, and you can debug the code to fix the issue.
Writing unit tests may require some effort upfront, but it will save you time and effort in the long run. It’s best to write unit tests alongside your code and make them a part of your development process.
Integration testing in React Native
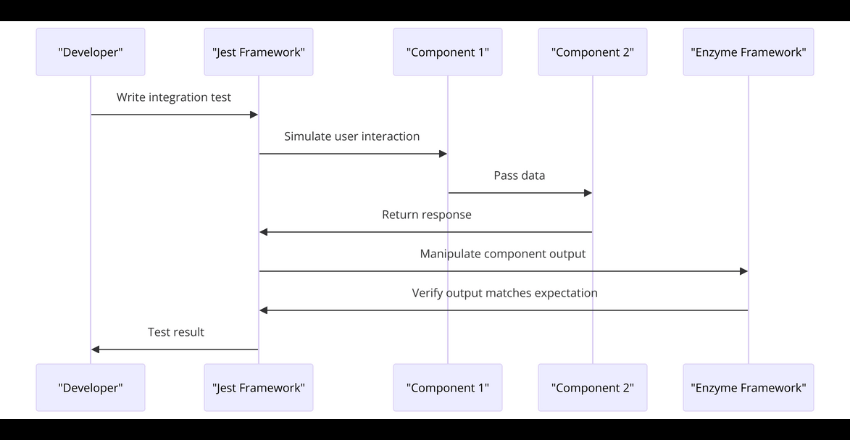
Integration testing is an essential part of React Native testing practices. It involves testing the interaction between various components and modules to ensure that they work together as expected. Integration testing helps to detect issues that may not be apparent during the unit testing phase.
One effective testing method for integration testing in React Native is to use a testing framework such as Jest. Jest provides built-in functionality for writing integration tests. Using Jest, you can simulate user interactions and test how your app responds to different scenarios.
Another popular testing tool for React Native is Enzyme. Enzyme is a JavaScript testing utility that allows you to manipulate and traverse your React components’ output. It provides a set of APIs for testing React components’ output, making it easy to test integration between components.
When writing integration tests, it’s important to ensure that your tests are deterministic and reliable. This means that your tests should produce the same results each time they are run. To achieve this, you can use tools such as snapshot testing or mocking to simulate consistent data and environments.
Example of Integration Testing using Jest
// Import the component to be tested

import MyComponent from './MyComponent';

// Simulate user interaction

const wrapper = mount(<MyComponent />);

wrapper.find('input').simulate('change', { target: { value: 'hello' } });

// Assert the expected result

expect(wrapper.find('h1').text()).toEqual('hello');
In the above example, we are importing a component called MyComponent and simulating user interaction by changing the input value. We then assert the expected result, which is that the value of the h1 element should be equal to ‘hello’.
By following best practices for integration testing in React Native, you can ensure that your app components and modules work together seamlessly. This helps to improve the overall quality and reliability of your app.
Snapshot testing in React Native
Snapshots testing is an effective way to track the user interface (UI) changes made to your React Native app. Snapshot testing takes a snapshot of a UI component at a particular moment, and then it compares it to the previous snapshot.
Snapshot testing is especially useful when frequent UI changes are being made, as it can help to detect unintended changes that may occur during the development process. Using snapshot testing can help to prevent those changes from making it to production, saving both time and money.
Snapshot testing in React Native can be done using the Jest testing framework. Jest is a powerful testing tool that developers can use to test their React Native apps. It comes with snapshot testing built-in, which means developers can easily run snapshot tests on their app components.
Example: To run a snapshot test in Jest, add the
toMatchSnapshot()function to an individual test case. This will take a snapshot of the component or function being tested and store it in a file. Any subsequent test runs will compare the newly generated snapshot to the original one, ensuring that no unintended UI changes have been made.
When using snapshot testing in React Native, it is important to update the snapshots when intentional UI changes are made. Failing to update snapshots can lead to failed tests that would otherwise pass, reducing the overall effectiveness of your testing suite.
While snapshot testing is an important tool in React Native app development, it is important to note that it should not be used as the sole testing method. Combining snapshot testing with other testing methods like unit testing, integration testing, and end-to-end testing will provide a comprehensive and effective testing suite that will help to ensure high-quality, bug-free app development.
End-to-end testing in React Native

End-to-end testing is a crucial part of React Native testing practices, as it allows developers to test the entire app flow and user interactions. By simulating real-life scenarios and checking if the app behaves as expected, end-to-end testing helps in identifying bugs and issues that might not be detected by other types of testing.
Writing end-to-end tests in React Native involves creating test cases that cover the entire app flow, from opening the app and navigating to different screens, to interacting with different elements and data. Popular testing frameworks for end-to-end testing in React Native include Detox and Appium.
Here’s an example of an end-to-end test that checks if a user can successfully log in to an app:
// Assume app is already running and user is on login screen

describe('Login flow', () => {

it('allows user to log in', async () => {

await element(by.id('usernameInput')).typeText('testuser');

await element(by.id('passwordInput')).typeText('password');

await element(by.id('loginButton')).tap();

await expect(element(by.id('homeScreen'))).toBeVisible();

});

});
As with other types of testing, it’s important to prioritize end-to-end tests based on their impact on the app’s functionality and user experience. This ensures that the most critical parts of the app are thoroughly tested, while avoiding excessive testing of less impactful features.
Test automation in React Native

Incorporating test automation into your React Native app development process can greatly improve the efficiency and accuracy of your testing. Automating tests can save time and resources while ensuring consistent and reliable results.
There are various testing frameworks and tools available for test automation in React Native. Some popular options include:
- Jest – a JavaScript testing framework that is widely used for React Native testing
- Detox – a testing library specifically designed for React Native apps that allows for automated end-to-end testing on both iOS and Android platforms
- Appium – an open-source testing framework that supports automated testing on multiple platforms, including React Native
When implementing test automation, it is essential to also incorporate continuous integration (CI) into your workflow. CI involves integrating testing into every stage of development, allowing for frequent and automatic testing of code changes. This helps to catch issues early on and ensure that the app remains stable and reliable throughout development.
Tip: When implementing test automation and CI, it is important to prioritize which tests to automate first. Focus on tests that are critical to app functionality and have a high likelihood of uncovering issues.
Example code:
| Test suite | Test description | Expected result |
|---|---|---|
| Login | Attempt to login with valid credentials | Should successfully login and navigate to home screen |
| Login | Attempt to login with invalid credentials | Should display an error message and stay on the login screen |
| Profile | Attempt to update user profile information | Should successfully update profile information and display a success message |
When writing automated tests, it is important to ensure that they are maintainable and scalable. Keep tests modular and reusable, using constants and variables where appropriate. This will make it easier to update tests as changes are made to the app.
Best practices for efficient React Native testing
Following best practices can make the testing process smoother and more efficient for React Native app development. Below are additional recommendations for effective testing:
- Test Coverage: Ensure that all app functionalities are thoroughly tested. Strive to achieve at least 80% test coverage for the app code. Use code coverage tools like Jest Coverage to measure the code coverage of your tests.
- Test prioritization: Prioritize tests based on their importance and potential impact on the app and its users. For instance, start by testing functionalities that are critical to the app, then proceed to other features that have less impact.
- Leverage testing frameworks and tools: Use relevant testing frameworks such as Jest and Enzyme to simplify the testing process. These frameworks have built-in features such as mocking and snapshots that can make writing tests easier.
- Use test doubles: Use test doubles like mock and stub to test specific functionalities. This can help to isolate the code under test and make the testing process more efficient.
- Continuous Integration: Use continuous integration tools like Travis CI and Circle CI to automate the testing process. Continuous integration ensures that tests are run automatically after every code push, reducing the chances of bugs entering the app codebase.
Code example for test doubles:
//Mock function with Jest

const myFunction = jest.fn();
myFunction(); //function called
expect(myFunction).toHaveBeenCalled();
Final Thoughts
Testing is an essential part of React Native app development. By following best practices for testing, developers can achieve higher quality apps with fewer bugs.
Setting up a testing environment and implementing various testing methods, including unit testing, integration testing, snapshot testing, and end-to-end testing, can greatly improve the efficiency of the development process and the overall quality of the app.
Automation of testing is also critical to increase efficiency, and developers should strive to optimize their testing frameworks and tools in order to achieve maximum test coverage and prioritize testing effectively.
By implementing these React Native testing practices and effective testing methods, cross-platform app developers can ensure their apps are of the highest quality, meeting the needs and expectations of their users.
External Resources
FAQ

FAQ 1: How can I effectively mock modules in React Native for unit testing?
Answer:
Mocking modules in React Native, especially for unit tests, is crucial for isolating components and ensuring your tests are focusing on the intended functionality. Jest, a popular testing framework with React Native, provides an easy way to mock modules. Here’s an example of mocking the AsyncStorage module:
// Setup Jest to mock the AsyncStorage module.
jest.mock('@react-native-async-storage/async-storage', () => ({
setItem: jest.fn(),
getItem: jest.fn(() => Promise.resolve('mocked value')),
}));

// Example test using the mocked AsyncStorage module.
test('stores data correctly', async () => {
const { setItem } = require('@react-native-async-storage/async-storage');
await setItem('key', 'value');
expect(setItem).toHaveBeenCalledWith('key', 'value');
});
Explanation:
This code snippet demonstrates how to mock the AsyncStorage module using Jest. By mocking setItem and getItem, we can control their behavior and assert that they are called with the expected arguments, making our unit tests more reliable and focused on the component’s logic rather than its dependencies.
FAQ 2: How do I test a component that uses hooks in React Native?
Answer:
Testing components that use hooks can be done effectively with the @testing-library/react-native. This library provides tools to render components in a test environment and interact with them as a user would. Here’s an example of testing a component that uses the useState hook:
import { render, fireEvent } from '@testing-library/react-native';
import React from 'react';
import MyComponent from './MyComponent'; // Assume this component uses useState internally

test('component state updates correctly', () => {
const { getByTestId, getByText } = render(<MyComponent />);
const button = getByTestId('increment-button');
fireEvent.press(button);
expect(getByText('Count: 1')).toBeTruthy();
});
Explanation:
In this example, MyComponent contains a button that, when pressed, increments a count displayed in the component. The test renders the component, simulates a button press, and checks if the displayed count updates as expected. This approach allows you to test the component as it would work in a real application, ensuring the hooks and their related state changes behave correctly.
FAQ 3: What’s the best way to test navigation behavior in React Native?
Answer:
Testing navigation behavior requires mocking the navigation prop that React Navigation passes to your components. Here’s how you can use Jest to mock the navigation prop and test navigation behavior:
import React from 'react';
import { render, fireEvent } from '@testing-library/react-native';
import MyScreen from './MyScreen'; // Assume this screen navigates to another on button press.

// Mock the navigation prop
const mockNavigate = jest.fn();
const navigationMock = {
navigate: mockNavigate,
};

test('navigates on button press', () => {
const { getByTestId } = render(<MyScreen navigation={navigationMock} />);
const button = getByTestId('navigate-button');
fireEvent.press(button);
expect(mockNavigate).toHaveBeenCalledWith('DestinationScreen');
});
Explanation:
This code mocks the navigation prop using Jest and passes it to the MyScreen component when rendered for the test. When the button is pressed, we assert that the navigate function was called with the expected argument ('DestinationScreen'). This method ensures your navigation logic is functioning as intended without needing to render the entire navigation stack.
Charlotte Williams is a talented technical author specializing in cross-platform app development. With a diverse professional background, she has gained valuable experience at renowned companies such as Alibaba and Accenture. Charlotte’s journey in the tech industry began as a mobile UX designer back in 2007, allowing her to develop a keen understanding of user-centric app design.
Proficient in utilizing frameworks like React Native and Flutter, Charlotte excels in building cross-platform mobile apps and imparting her knowledge to aspiring developers. She pursued a degree in Computer Science at Cornell University, equipping her with a strong foundation in the field. Residing in San Francisco with her three beloved dogs, she finds solace in hiking the hills and connecting with nature. Charlotte’s passion for app development, combined with her dedication to sharing expertise, makes her an invaluable resource in the world of cross-platform app development.
